Key Takeaways
- Crotalaria seeds need warm soil and moisture to sprout.
- Choose a sunny spot with well-drained soil.
- Sow seeds 2-5 mm deep depending on variety.
- Water gently after planting.
- Seeds sprout in 10-21 days at 65-72°F.
- Provide sun and water once seedlings emerge.
- Harvest in 2 months when flowers appear if growing for fiber.
Introduction?
Crotalaria is a group of plants used for many purposes. The strong fibers from Crotalaria stalks are made into rope and bags. The plants also help enrich soils. Crotalaria seeds contain chemicals used in some medicines too.
This article will explain step-by-step how to plant Crotalaria seeds. It will cover how to pick the right spot, sow the seeds correctly, care for seedlings, and know when to harvest. Useful facts and research will show why certain steps matter. The goal is to help readers grow Crotalaria successfully from seeds.
Understanding the process of planting Crotalaria seeds unlocks being able to grow this useful plant yourself. Follow the guide below to get your Crotalaria seeds off to the best start. Discover what it takes to turn tiny seeds into mature, fiber-producing plants.
Where to Plant Crotalaria Seeds?
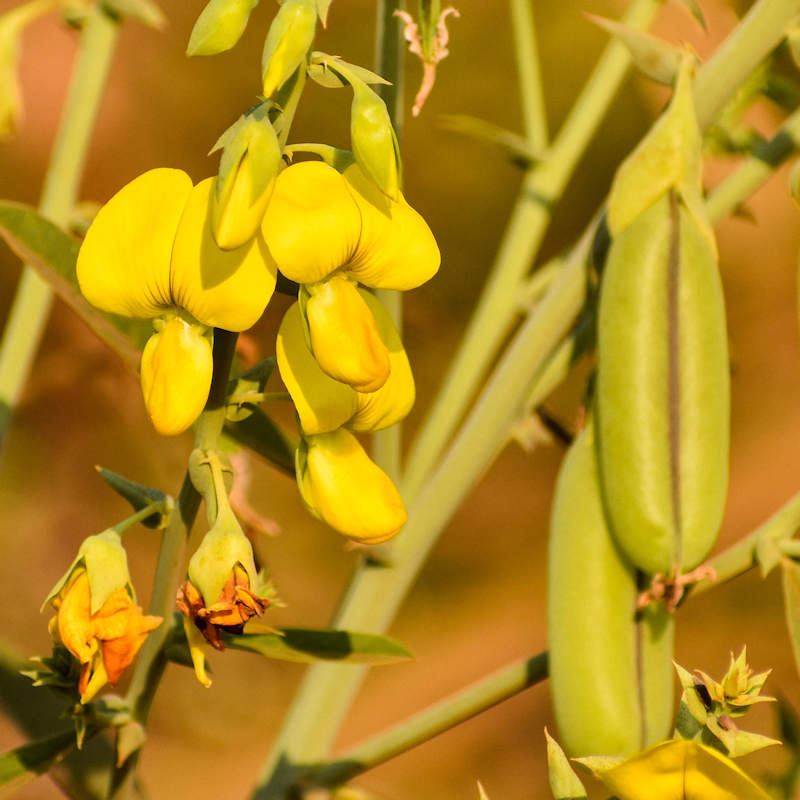
Crotalaria needs lots of sun to grow well. Pick a place in full sun for at least 6 hours per day. Morning sun is especially important. Crotalaria can handle some shade but produces the most seeds and fiber in full sun.
Soil is also key when starting seeds. Crotalaria thrives in light and loose soil that drains easily after watering. Heavy clay soil can work with added compost to lighten it. Very sandy soil may need more watering. Test soil drainage by digging a hole 12 inches deep and filling it with water. If water drains fully in less than 4 hours, drainage is good.
Here are the best conditions for planting Crotalaria seeds:
- Full sun – at least 6 hours of direct sun daily
- Loose, well-draining soil high in organic matter
- pH between 5.5-7.5 – not too acidic or alkaline
- Flat ground is ideal, but can tolerate slopes up to 30 degrees
- Near a water source for irrigation
With the right location, Crotalaria seeds will sprout more easily and grow better.
How Deep to Plant Crotalaria Seeds?
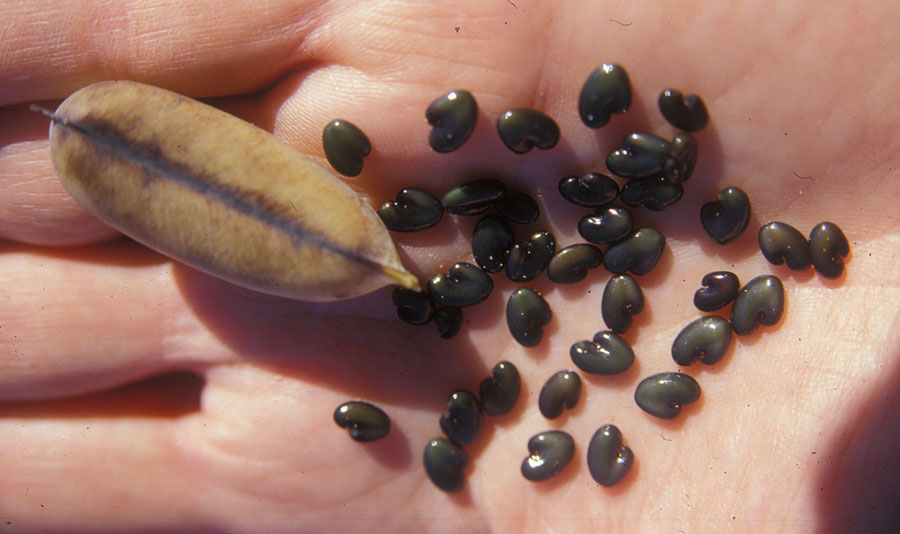
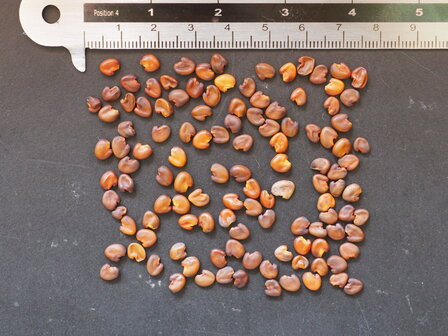
Crotalaria seeds are small, so planting depth matters. Research shows ideal planting depths range from 2-5 mm (1/16 – 1/4 inch). This puts seeds close to the warm moist soil needed for sprouting.
Planting too deep risks seeds not getting enough warmth to germinate well. Planting too shallow leaves them prone to drying out. Sticking to 2-5 mm depth works well for most Crotalaria varieties.
Specific depth guidelines based on research:
- 2-3 mm: Recommended depth for most fiber Crotalaria species. Puts seeds in warm moist zone.
- 5 mm: Depth used in studies with Crotalaria juncea seeds with good germination.
- Peat pellet: Some start seeds in peat then cover with 1 mm peat layer. Keeps surface moist.
Adjust planting depth slightly within the 2-5 mm range based on factors like seed size and soil moisture. The goal is warm, moist soil contact for the seeds.
How to Sow Crotalaria Seeds
Crotalaria can be sown in rows or scattering evenly across the soil. Rows make caring for seedlings easier. Scattering works for large areas. Here are sowing guidelines:
Rows:
- Use a hoe to make shallow trenches 1 cm deep. Space rows 30-90 cm apart depending on plant density needed.
- Sow seeds in rows 2-5 mm deep. Space 10-15 cm apart within rows.
- Cover seeds gently with fine soil.
- Water carefully after sowing with a mist sprayer. Keep soil moist but not saturated.
Scattered:
- Work soil 2-3 inches deep before sowing. Break up any clumps.
- Broadcast seeds over the prepared bed by hand or seed spreader.
- Gently rake seeds 2-5 mm into the soil surface.
- Mist spray to water seeds without washing them away.
Proper spacing prevents overcrowding when seedlings emerge. Watering after sowing helps seeds stay moist as they sprout.
Caring for Seedlings
Crotalaria seeds can sprout in as little as 3 days in warm moist soil. Most come up within 10-21 days after planting at temperatures between 65-72°F. Seeds won’t sprout well below 60°F.
Newly emerged seedlings need:
- Sunlight: At least 6 hours of sun daily for robust growth. Morning sun is important.
- Water: Keep soil consistently moist 1-2 inches down. Less required in humid climates.
- Weeding: Remove competing weeds to reduce water and nutrient competition.
- Thinning: For rows, thin crowded seedlings to proper spacing once established.
With good care, seedlings develop quickly into vigorously growing Crotalaria plants.
When to Harvest Crotalaria
There are two main purposes for growing Crotalaria – fiber production and green manure.
For fiber production, research recommends harvesting Crotalaria when flowers start appearing, typically around 2 months after sowing. This balances fiber yield versus quality.
Key signs Crotalaria is ready for fiber harvest:
- Plants begin flowering
- About 2 months after seed sowing
- Stems 1-2 meters tall depending on variety
To harvest, cut plant stems close to the ground. Dry and ret the stems to separate fibers.
When growing Crotalaria as green manure, let it grow 2-4 months until flowering starts. Then till the plants into the soil to provide organic matter. The extra growing time increases nutrients added to the soil.
Frequently Asked Questions
What are the best Crotalaria varieties for fiber?
Some top fiber Crotalaria species are:
- Crotalaria juncea – produces long strong fibers and grows fast.
- Crotalaria spectabilis – long thick fibers used for ropes and twines.
- Crotalaria brevidens – higher fiber yields and more rot resistant.
Can Crotalaria be grown in containers?
Yes, Crotalaria can be grown in large pots or containers at least 12 inches wide and deep. Use potting mix and provide full sun. Water more frequently in containers.
How long do Crotalaria seeds last?
Crotalaria seeds stored properly in a cool dry place can last 1-2 years with good germination rates. For best results, use fresh seeds each season. Old seeds lose viability over time.
What pests or diseases affect Crotalaria?
Some potential Crotalaria problems include:
- Spider mites – look for webbing and speckling on leaves.
- Leaf spot fungus – brown spots on leaves and stems.
- Root rot – stunted growth and yellowing leaves. Improve soil drainage.
- Deer, rabbits, insects – may eat young shoots and leaves. Use fencing if a severe issue.
Proper site selection, crop rotation, and maintenance can help avoid most Crotalaria pest and disease issues.
Can I grow Crotalaria and vegetables together?
It’s not recommended. Crotalaria contains alkaloids that may suppress growth of other plants. Separate edible crops and Crotalaria. However, rotating into a Crotalaria cover crop can benefit future vegetable yields.
Conclusion
Following the steps outlined above will set your Crotalaria seeds up for success. Picking the right planting site, sowing at the proper depth, caring for seedlings, and knowing when to harvest are key to growing a healthy productive crop.
Crotalaria is a versatile plant that can enrich soils, produce fiber, and more. With these guidelines for planting seeds, you can establish thriving stands of this useful plant. The research-backed advice will help boost germination rates and growth.
Growing Crotalaria from seed is a rewarding way to produce your own fibers or green manure. Take the first step by sourcing viable Crotalaria seeds and preparing planting beds. Then work through this guide to turn tiny seeds into vigorous mature plants. With the right care, your crop can reach its full potential
- What is cross platform play?
- How Long Does It Take to Bike 14 Miles?
- Can You Have Cough Drops with Invisalign?
- West Ham vs Chelsea: A Detailed Review of the Premier League Clash
- Is Sub District and Taluka the Same in India?
- At What Speed Does Time Slow Down?
- How to Get Pipe Dope Out of Clothes?
- How Long Should I Leave Cetaphil on My Face?
- What Is a Synonym for Retaliator??
- How Is Utnapishtim Warned of the Upcoming Flood?
- How Does a Tornado Form?
- Can Sheen Be Added to Flat Paint?
- What Does It Mean To Do Someone Injustice?
- What Is a 3 Stringed Instrument?
- What Is a Cross Threaded Screw?