Creating a Gantt chart in Keynote is relatively easy and only requires a few steps. With Keynote, you can create simple charts like bar graphs and line graphs, or more complex ones like Gantt charts and flowcharts. In this guide, we’ll show you how to make a Gantt chart in Keynote.
Before we get started, let’s take a look at what a Gantt chart is and why you might want to use one.
What is a Gantt Chart?
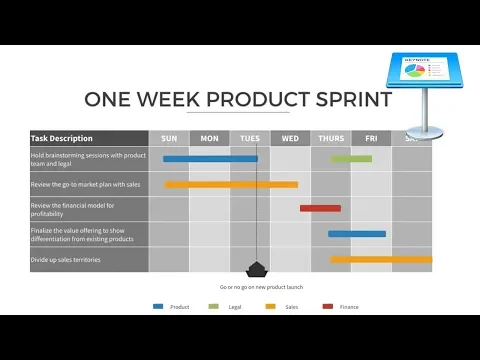
A Gantt chart is a type of bar chart that shows the start and end dates of tasks in a project. The chart is named after Henri Gantt, who created a similar chart in the early 1900s.
Gantt charts are commonly used in project management to track the progress of tasks. They can be used for any type of project, from building a house to planning a wedding.
- How to Get Rid of Hollow Arrow on iPhone?
- How Do I Cancel My Hinge Subscription?
- Can You Block People on Bumble?
Can I make a Gantt chart in Keynote?
Yes, you can make a Gantt chart in Keynote. Keynote is a presentation software application developed by Apple Inc. It’s part of the iWork productivity suite, which also includes Pages (a word processor) and Numbers (a spreadsheet application).
Keynote is primarily used to create slideshows, but it can also be used to create other types of charts and diagrams.

How to Make Flowcharts and Gantt Charts in Keynote?
- How Do I Get My Planet Fitness Key Tag?
- Why Does Procreate Keep Crashing?
- How to Add Birthday Field to Hubspot?
How do I make a Gantt chart in Keynote?
Here’s a step-by-step guide to creating a Gantt chart in Keynote:
1. Launch Keynote and create a new document.
2. Select the Insert menu and choose the Chart option.
3. In the dialog box that appears, select the Gantt chart type and click OK.
4. Enter your data into the corresponding fields. The Name field is for the task name, the Start Date field is for the start date, and the End Date field is for the end date.
5. To add more tasks, click the + button at the bottom of the dialog box.
6. When you’re finished adding data, click OK.
7. Your Gantt chart will now appear in the Keynote document.
How do I make a timeline chart in Keynote?
A timeline chart is similar to a Gantt chart, but it shows the tasks in chronological order. To create a timeline chart in Keynote, follow these steps:
1. Launch Keynote and create a new document.
2. Select the Insert menu and choose the Chart option.
3. In the dialog box that appears, select the Timeline chart type and click OK.
4. Enter your data into the corresponding fields. The Name field is for the task name, the Start Date field is for the start date, and the End Date field is for the end date.
5. To add more tasks, click the + button at the bottom of the dialog box.
6. When you’re finished adding data, click OK.
7. Your timeline chart will now appear in the Keynote document.
- How Did Somebody Put Screen Record on My Phone?
- How Do I Get My Music on Jpay?
- How to Charge the Rose?
How do you make a Gantt chart on Mac?
There are a few different ways to make a Gantt chart on a Mac. One way is to use Keynote, as described above. Another way is to use Numbers, which is a spreadsheet application that’s also part of the iWork suite. Finally, there are several third-party applications that allow you to create Gantt charts on a Mac, such as OmniPlan and MindNode.
How do you make a Gant chart?
A Gant chart is just another name for a Gantt chart. So, to make a Gant chart, you can follow the steps described above for creating a Gantt chart in Keynote.
- Why Is My Cox Router Blinking Green?
- How to Change Light Mode on a Fantech Keyboard?
- How to Search Music on Apple Music?
Why use a Gantt chart?
Gantt charts are useful for project management because they provide a visual representation of the tasks involved in a project and the timeline for those tasks. This can help you to see at a glance which tasks are dependent on others, and it can also help you to spot potential bottlenecks in the project.
- Can you see calculator history on iPhone?
- Can You Wear Hey Dudes Without Socks?
- Why Stock Market Is Down?
- What Does Hydration Percentage Mean?
- How Much Does a Slurpee Cost?
- Did Quintessential Quintuplets End?
- How to Know If Someone Blocked You on Textnow?
- How old is matt wright pickleball?
- Do You Wear Socks with Brogues?
- How to Beat a Controlled Buy?
- How to Move Apple Music to New iPhone?
- How to Reset Ford F350 Oil Light? An In-Depth, Step-by-Step Guide
- How Many Jobs Are Available in Clothing/Shoe/Accessory Stores??
- When Should You Go to the Doctor for a Horse Fly Bite?
- What Is the Extent of South America?